Monday, December 20, 2010

Not moving to a new blog

--Christmas 2010 Snow--

Well, since both of my blogs (this one and "...and then we set it on fire") are tied to my yahoo email account, I have to keep this blog operational and deal with receiving emails on my yahoo email account.

Monday, December 13, 2010

Snowman Wallhanging

The snowman wallhanging is done, and on the way to Monroe, New York to my daughter's house.


Wednesday, December 8, 2010

Cold December

Some Christmas things that have been in the works:

Some "spiderweb" shibori:

These circles are actually pretty small, about 2" across or less.

And a piece I've been working on, doing some pretty heavy quilting. I belong to a PAQA-South organization and there's a show coming up in March. I'm trying to get the nerve up to enter it, possibly with this piece, so I can't show it all now.

It's been really cold here (by NC standards, anyway)--morning lows of 15-16 degrees, then it doesn't even get above freezing during the day. Normal highs are around 50-55 degrees! So, it's really cut into my dyeing/painting/surface design, and I've been inside quilting almost all day the past few weekends instead of in the garage. Hope it warms up for my Christmas-New Year break.
30 years ago today...

Friday, December 3, 2010

Focus

An excellent post from Jane Dunnewold that has me thinking hard: Focusing.

This is the part of her post that really speaks to me:

I think focusing loses its appeal because we make the mistake of believing that if we decide to focus our efforts, we’ll leave something else wonderful behind. That somehow we’re choosing forever.Not true!

Focusing doesn’t mean you can’t do everything you find appealing. It just means that for some pre-determined period of time you are going to choose INTENTIONALLY to work with some limits.
Picture the old mother in the shoe, who had so many children she didn’t know what to do. Every mother knows that each child requires at least a few minutes of individual attention every day in order to blossom into a human being with healthy self-esteem.

So this is your approach – and the first assignment (of which the next blog entries will suggest several…)Don’t be the old woman in the shoe – with so many projects you don’t know what to do. Think about each project, technique or how-to book that interests you. DO make some notes about what appeals and then do a little mental ranking. What do you want to do MOST right now – in this space of time? Think about concentrating your efforts on one interest – either for a specific period of time, or until you complete a certain number of works employing the technique, OR until you feel you have mastered it.

When you feel really good about the project or process from one of those angles, you’ll feel equally good about moving on to something new. OR perhaps, about sticking with it even longer – because you have discovered how much more there is to explore.

Monday, November 29, 2010

I won something!

Opened my email this morning, and found an email from Rossie (Fresh Modern Quilts) saying that I had won a giveaway on her blog (http://r0ssie.blogspot.com/2010/11/thanksgiving-is-coming.html)

I won a thermofax screen and paint from Lynn Krawczyk (see her website at http://www.fibraartysta.com/) I had been checking these out on her website and etsy shop, so I'm very excited about winning--can't wait to try it out.

Monday, November 22, 2010

Weekend Flops

Not a productive weekend, at all. Everything I tried to do seemed doomed to failure! I guess it was just one of those things, it WILL get better.

Tried leaf printing by rolling up leave in a piece of fabric, then simmering the bundle in water and some alum. Results are less than fantastic, aren't they? If anyone has any secrets on how this can work out better, please share!


Last Thursday I took the day off and went to a workshop in Winston-Salem with Roxann Lessa. I thought the class covered "How to Make a Pattern from a Photograph" but it actually was "How to Make a Quilt from her Pattern that she already made from a Photograph".

Her photo is below with the blue flower.


And this is my interpretation of her flower picture. The yellow & white are done with fabric textile paint. Not much else to say about this, is there?


Finally, one of my co-workers gave me some fabric to make her two pillows. The fabric isn't exactly my style, so I made the back of the pillows with her fabric, and made the front with my own stash fabrics.


Wednesday, November 10, 2010

Distortion & Shrinkage


In her book Stitching to Dye in Quilt Art, C. June Barnes has some really intriguing techniques. You basically start with a white or light colored background, some wool felt, and some white cotton thread. I made this sample over the weekend to see how complicated the process was, and it was actually pretty easy.

I started with a piece of grey fabric I had, and a piece of wool/rayon blend felt (bought at Joann Fabrics). Since I wanted to create a pop-up, dimensional thing like in the book, I took some interfacing and made a circle, then sewed "channels" into it with dissolving thread (thanks, Jenny!) in the top and regular thread in the bottom. When my channels were sewed, I inserted a piece of strapping (the kind like a package gets wrapped in--very hard and stiff)--you could also use plastic coffee stirrers or pieces of craft foam.

I also cut out a circle of craft foam for the middles, and sewed around them, forgot to mention that earlier!

All you do is put the wool felt underneath, and that acts as your batting. Here is are the wheelie-things with some free motion quilting started.

Once you get it all quilted, you have to wash it in your washing machine in hot water. I chickened out, though, and put it in my bathtub and ran hot water over it and let it soak for a while. It really shrank up quite a bit, but I think the agitation of the washer would have been better. After shrinking, you direct dye it with Procion MX dyes--again, I did this in my bathtub because it was "cold" outside. The dye doesn't migrate at all because the felting underneath absorbs so much of it, which was VERY different than other dyeing I've done.
This technique was so cool to try, and now that I've done it once, I'm braver, and think I will try it again this weekend! Link to her book on amazon: http://www.amazon.com/Stitching-Dye-Quilt-Art-Distortion/dp/0713490705

Thursday, November 4, 2010

Not a UFO anymore

This Darned Quilt is finally done, it took me forever because I just haven't felt like doing anything when I get home from work lately. Maybe because it's already dark?

Close ups showing the stitching:

(Ignore the date, please)


Monday, October 18, 2010

Darned Quilt class

I've been working on a "Darned Quilt", in an on-line class through Quilt University (quiltuniversity.com). Dena Crain is the teacher, and this is my first on-line quilt class experience. First, we started with a fabric gradation (hand dyed by me, of course), and cut & pieced the curved background. Then sewed lots of contrasting strips & embellishments across the piece:
Once the background is finished, then you cut circles out, and reposition them:

It's kind of scary at first, but gets easier with each one!
My work in progress:

I think it looks awesome, now I have to sew each of the circles in place using a darning stitch. And maybe cut out some more circles!

Wednesday, September 29, 2010

Pictures of Dyeing Results

Using just three Warm colors, Chinese Red, Cobalt Blue & Warm Yellow, I was able to dye all these colors shown here:

The directions were from a book called Dyeing to Quilt, and were pretty easy to follow (with a little concentration needed). The fabric I used was a bamboo/cotton blend I got at Joann's a while back. There was only about 1/2 yard left on the bolt I had, so I used small strips so I could get all 12 colors.
One more picture of the bamboo/cotton fabric:
Then, I used the same dye colors on some white linen that I've already used to dye a few times with. Here are the same colors on the linen:

So, by this time I was all out of fabric, and had to go buy more. I went to the closest quilt fabric store in Lexington, NC, about 10 miles from my house, and all they had in the way of a plain white was some off-white muslin. Since Joann's was another 15-20 miles away, I got the muslin.

This is the fabric I showed in the cups in Monday's post. The colors I used were the clear primaries (Fuchsia, Sky Blue & Lemon Yellow). The colors were wonderful while in the cups, but the fabric is poor quality and just doesn't hold the dye well at all.

One more shot of the clear primaries:

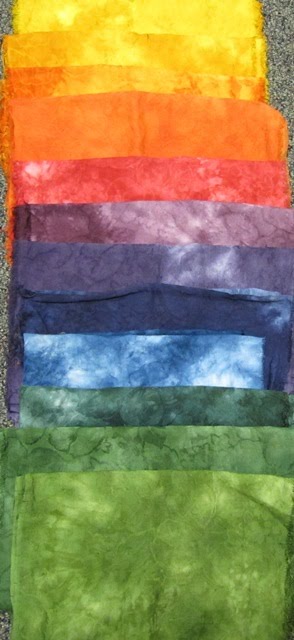
The last thing I tried (by then it was Sunday) was a 6-color gradation from yellow to purple. The yellow in this picture is on the right, it actually looks more green here than what it really is. Again, this was on the off-white muslin, and I definitely wouldn't waste my time dyeing with such poor quality fabric in the future. But it was good for experimenting with--and I hope by posting this information here, you all will learn from my mistakes and start with the good stuff.

Monday, September 27, 2010

Serious Dyeing Weekend

I took Friday off from work, and spent some time dyeing fabrics (again). But this time I followed actual directions from a book, Dyeing to Quilt by Joyce Mori, and created all of the colors shown here with three cool primaries.

Here's the cups all lined up, ready to have the counted number of tablespoons and teaspoons. I'm not a person who is really precise, so this exercise took a lot of concentration.
This is one of the color wheels I was trying to recreate:
Sorry, no pictures of the finished products, my camera batteries went dead when I tried to take one. No extra batteries, either. Maybe tomorrow...

Tuesday, September 14, 2010

Batiked Flowers

One more thing I worked on this weekend (forgot to post a picture yesterday). I batiked a wax outline of the flowers using my tjanting tool, then painted the red, green, and brown. Then I boiled off the wax--there is still a little bit sticking to the fabric, you can see if you look close.

It was a tedious process, but the results were worth it. The piece is only about 20" x 30", so it isn't huge--making yardage using this process would take forever!

Monday, September 13, 2010

Another weekend come and gone

Over the weekend, I took a blue piece of fabric, batiked (with wax) some circles on it, then dyed it in brown. After boiling out the wax, this is what I had.

This black & white fabric

has become this:

I wanted to use the plexiglas shapes I bought a while back to do these circles, but didn't have enough clamps. Instead of driving 12 miles to the hardware store to get some, I just used the good old beeswax for them, too. The fabric wasn't as tightly woven as the egyptian cotton I used in the blue/brown one, so the wax took forever to come out--boiling, ironing, and washing finally did the trick. Have to get some clamps the next time I go to Lowes or Home Depot.
Here are some "what was I thinking when I bought it" fabrics, I dyed w/a few different colors.

Monday, August 30, 2010

Carmine Red Cloth

I finished (except for hand-sewing the binding) this crazy batiked wholecloth that I waxed and dyed a while back. I'm pretty happy with how it turned out, not thrilled, but happy. The flower centers were done in clusters of french knots. The red color isn't what I'm used to working with, maybe that's why I'm not 100% thrilled with it.

And here is what's up on my design wall today. I'm using the Benartex printed sheets for this, and it really goes together easily, I'd highly recommend them to anyone who wants to try one of these quilts!

And, here is another project in the works, using my hand-dyed and printed fabrics: