Monday, October 18, 2010

Darned Quilt class

I've been working on a "Darned Quilt", in an on-line class through Quilt University (quiltuniversity.com). Dena Crain is the teacher, and this is my first on-line quilt class experience. First, we started with a fabric gradation (hand dyed by me, of course), and cut & pieced the curved background. Then sewed lots of contrasting strips & embellishments across the piece:
Once the background is finished, then you cut circles out, and reposition them:

It's kind of scary at first, but gets easier with each one!
My work in progress:

I think it looks awesome, now I have to sew each of the circles in place using a darning stitch. And maybe cut out some more circles!

Wednesday, September 29, 2010

Pictures of Dyeing Results

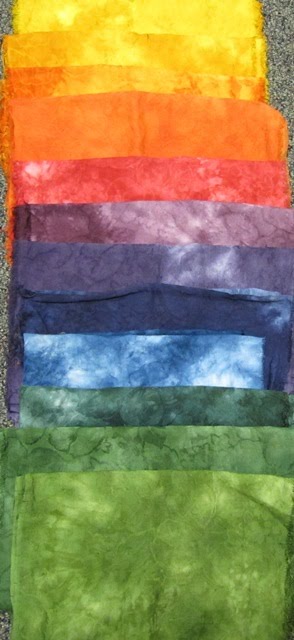
Using just three Warm colors, Chinese Red, Cobalt Blue & Warm Yellow, I was able to dye all these colors shown here:

The directions were from a book called Dyeing to Quilt, and were pretty easy to follow (with a little concentration needed). The fabric I used was a bamboo/cotton blend I got at Joann's a while back. There was only about 1/2 yard left on the bolt I had, so I used small strips so I could get all 12 colors.
One more picture of the bamboo/cotton fabric:
Then, I used the same dye colors on some white linen that I've already used to dye a few times with. Here are the same colors on the linen:

So, by this time I was all out of fabric, and had to go buy more. I went to the closest quilt fabric store in Lexington, NC, about 10 miles from my house, and all they had in the way of a plain white was some off-white muslin. Since Joann's was another 15-20 miles away, I got the muslin.

This is the fabric I showed in the cups in Monday's post. The colors I used were the clear primaries (Fuchsia, Sky Blue & Lemon Yellow). The colors were wonderful while in the cups, but the fabric is poor quality and just doesn't hold the dye well at all.

One more shot of the clear primaries:

The last thing I tried (by then it was Sunday) was a 6-color gradation from yellow to purple. The yellow in this picture is on the right, it actually looks more green here than what it really is. Again, this was on the off-white muslin, and I definitely wouldn't waste my time dyeing with such poor quality fabric in the future. But it was good for experimenting with--and I hope by posting this information here, you all will learn from my mistakes and start with the good stuff.

Monday, September 27, 2010

Serious Dyeing Weekend

I took Friday off from work, and spent some time dyeing fabrics (again). But this time I followed actual directions from a book, Dyeing to Quilt by Joyce Mori, and created all of the colors shown here with three cool primaries.

Here's the cups all lined up, ready to have the counted number of tablespoons and teaspoons. I'm not a person who is really precise, so this exercise took a lot of concentration.
This is one of the color wheels I was trying to recreate:
Sorry, no pictures of the finished products, my camera batteries went dead when I tried to take one. No extra batteries, either. Maybe tomorrow...

Tuesday, September 14, 2010

Batiked Flowers

One more thing I worked on this weekend (forgot to post a picture yesterday). I batiked a wax outline of the flowers using my tjanting tool, then painted the red, green, and brown. Then I boiled off the wax--there is still a little bit sticking to the fabric, you can see if you look close.

It was a tedious process, but the results were worth it. The piece is only about 20" x 30", so it isn't huge--making yardage using this process would take forever!

Monday, September 13, 2010

Another weekend come and gone

Over the weekend, I took a blue piece of fabric, batiked (with wax) some circles on it, then dyed it in brown. After boiling out the wax, this is what I had.

This black & white fabric

has become this:

I wanted to use the plexiglas shapes I bought a while back to do these circles, but didn't have enough clamps. Instead of driving 12 miles to the hardware store to get some, I just used the good old beeswax for them, too. The fabric wasn't as tightly woven as the egyptian cotton I used in the blue/brown one, so the wax took forever to come out--boiling, ironing, and washing finally did the trick. Have to get some clamps the next time I go to Lowes or Home Depot.
Here are some "what was I thinking when I bought it" fabrics, I dyed w/a few different colors.

Monday, August 30, 2010

Carmine Red Cloth

I finished (except for hand-sewing the binding) this crazy batiked wholecloth that I waxed and dyed a while back. I'm pretty happy with how it turned out, not thrilled, but happy. The flower centers were done in clusters of french knots. The red color isn't what I'm used to working with, maybe that's why I'm not 100% thrilled with it.

And here is what's up on my design wall today. I'm using the Benartex printed sheets for this, and it really goes together easily, I'd highly recommend them to anyone who wants to try one of these quilts!

And, here is another project in the works, using my hand-dyed and printed fabrics:

Monday, August 16, 2010

Creativity Quiz


Here's a simple quiz that might give you insight into your creative side. According to my results, creativity enriches me.

"What you are really looking for is harmony — you want to feel you are a part of what you create."

and

"you seem more suited to the sort of creativity that calls for gentleness, subtlety, harmony and patience. "

Thursday, August 12, 2010

Dyeing again


Another dyeing day yesterday, I mixed up two dye baths yesterday morning before work and put some pieces in. The colors I used were teal blue and khaki (both from Dharma). It's so interesting to me to see how different they turned out!

These three were all in the teal blue dye bath:

And these were in the khaki dye bath:

Because I put the fabric in and didn't stir it a few times during the day, you can see that the darker ones were most likely sitting on the bottom of the dishpan I use for dyeing. The khaki apparently contains a mixture of brown and green, and the green is less dense than the brown portion, so the brown sinks and the green sits on top--that's why one piece looks all green.
I'm also trying out different shibori tieing techniques, and am really liking how they're turning out.

Monday, August 9, 2010

Shibori & goats

A few weeks ago I shibori-dyed this piece of fabric. While I liked the pattern a whole lot, the colors were just too bright for me to use.

So, on Saturday I got out my batik wax, and drew some circles and lines on the piece, then overdyed with warm black, and got this, which I think will make a great wall hanging:

And what is this? Breakfast for goats, of course.

My neighbor has two goats, and they "forget" to feed them, I'm afraid. They're in a smallish enclosure that has been stripped of all vegetation. The poor things cry all the time, so I finally started feeding them. I've even been giving them hay and cuttings from my trees and shrubs.
This pygmy is Zackie:

And this is Brownie--you can see how thin the poor thing is.

Monday, August 2, 2010

Shibori Dyeing

Before my vacation started, I got a bunch of books through the interlibrary loan program at the university library where I work. Two that I liked best were:

One of these had a simple recipe for direct-dyeing, which I copied into my sketch book:
I did a machine stitching technique on a pretty bright fuschia (or maybe it was carmine red) piece that I had dyed a while back, then poured on some plum and yellow dyes using my recipe and mixing bottle:


This is how it looked after I opened it up, (taking out all those stitches with a seam ripper since the stitching stayed damp after the fabric was pretty much dried)
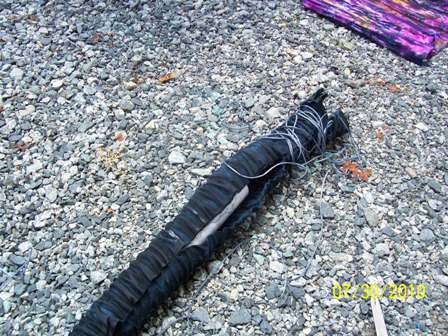
Also, I took a white piece of fabric and wrapped around a PVC pipe, tieing it with a string and scrunching down as tightly as I could while wrapping. Then I squirted some Warm Black dye on it, followed by some Jet Black about 10 minutes later.
Here is the unwrapping:
I love how it looks, I folded this piece in thirds before dyeing, so it looks a little more interesting, and I also twisted the fabric as I was scrunching it down, so it was a little more wavy. (I was trying to get the look of the work of Jan Myers-Newbury, but I have a way to go!)

These pieces were just accordion folded before dyeing:

This blueish piece was folded in half, then wrapped on the pole and squirted with fuschia dye: